
How to Install Concrete Countertops: A Step-by-Step Guide
Are you interested in learning how to install concrete countertops? If so, you have come to the right place! In this blog post, we will walk you through the step-by-step process of installing concrete counters.
We will also answer some common questions that people have about this process.
So, whether you are a DIY enthusiast or you are thinking about hiring a professional to do the job for you, this blog post has something for everyone!
Benefits of installing concrete countertops
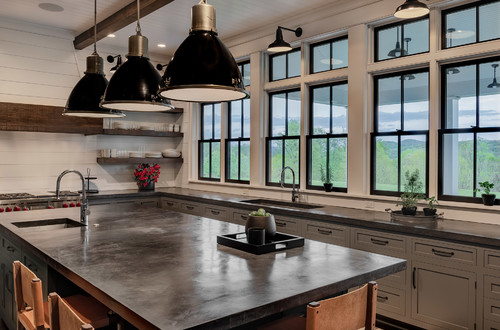
Installing concrete countertops is a great way to add value to your home. Not only will they make your kitchen or bathroom look more stylish, but they are also very durable and easy to maintain. Concrete countertops can be customized to fit any style and budget. That is just one reason why they are a great option for anyone who is looking to update their space.
Materials you will need to install concrete countertops
The first step in installing concrete countertops is to gather the materials you will need. This includes things like concrete mix, rebar, wire mesh, silicone caulk, melamine, screws, and sealer.
The cost of installing concrete countertops
The cost of installing concrete countertops will vary depending on the size and complexity of your project. However, you can expect to spend around $200-$300 on materials alone.
If you need to purchase additional tools, the price will increase. And, if you are hiring a professional to do the job for you, the cost will also be higher.

How much time does it take to install concrete countertops
Installing concrete countertops is a fairly time-consuming project. It will take several days to complete, from start to finish. However, the results are definitely worth the effort!

The Step-by-Step Process of How to Install Concrete Countertops
Step One: Preparing the Area for Pouring Concrete Countertops
The first step is to prepare the area where you will be pouring the concrete. This includes removing any existing countertops.
If you have laminate counters, check to see if they are attached with screws through the bottom of the countertop.
If you are installing a new sink with your new countertops, take some time to read the instructions that come with the sink. This will help you to understand how to properly install it.
Installing an undermount sink will require some additional work. You will need to plan ahead of time to make sure that the sink is properly supported.
Undermount farmhouse sinks will need to be installed before the countertops.
Step Two: Creating a Mold for your Concrete Countertops
The next step is to create a mold for your concrete countertops. You can use wood or metal.
One method for casting concrete counters is called the reverse cast technique. This involves building a template and then creating a mold out of wood or metal that will be the exact size and shape of your finished countertop.
You can use strips of 1/4 inch plywood to create your template. Remember to account for a countertop overhang of about one and a half inches.
This amazing youtube tutorial shows you how to use sheets of melamine to create your molds, including how to make a knockout for your sink.
Once you have created the mold, you will need to measure out wire mesh to use as reinforcement. This will help to strengthen the concrete countertop and prevent cracks.
You may need bolt cutters to cut the mesh down to the size you need.
If you are going to add rebar, you should also measure and cut that at this point.
Finally, use silicone caulk to seal the mold and create a beveled edge inside of your mold. (The video does a great job of showing this step!)
Step Three: Mixing the Concrete
After the mold is prepared, it’s time to mix the concrete. Concrete countertops are made with a special concrete mix that is designed to be strong and durable.
Next, if you would like, you can add concrete colorant as you are mixing your concrete.
Be sure to keep specific notes about the amount that you add, though. Your concrete will need to be mixed in batches, and you want the colors to match each other as closely as possible.

If you want white concrete counters, you can purchase a special white concrete countertop mix [HERE]or [HERE].
Black concrete countertops are another popular option!
Once the concrete is mixed, you can start to add it to the mold that you have created.
Step Four: Pouring the Concrete
Start placing the concrete into the mold with your hands (be sure to wear gloves!), being sure to fill all corners and edges evenly.
If there are any visible air pockets in the concrete, you can use a chopstick or similar object to break them.
You should also vibrate the concrete in order to get the air pockets out that you can’t see.
Step Five: Adding Reinforcement
Once the concrete mold is filled about halfway, it’s time to add reinforcement.
This can be done by adding the wire mesh and/or rebar that you cut earlier. These reinforcements will help to prevent cracking and improve the overall strength of your countertops.
Take care to fit your wire mesh carefully and securely into the concrete that is already in the mold.
Step Six: Finish Adding the Concrete
Once your reinforcements are seated in place, finish filling the mold with concrete. Use your gloved hands to really integrate the second pour of concrete with the first pour.
Use a scrap board to screed the concrete, moving it back and forth to level the concrete and remove high spots. Trowel the surface to make it even.
Step Seven: Curing the Concrete
After the concrete has been poured and reinforced, it will need to cure. This process can take 2-3 days. During this time, you will need to keep the concrete moist by misting it with water several times a day.
Step Eight: (Optional) Wet Polishing the Concrete
Wet polishing is another optional step that can help to give your countertops a high-gloss finish. You will need to use a wet polisher and a series of diamond abrasive pads to polish the concrete.
Step Nine: Sealing the Concrete
Once the curing process is complete, you can seal the concrete. This will help to protect it from stains and other damage. Concrete sealers can be purchased online or at your local hardware store.
Step Ten: Installing the Concrete Countertops
Once the concrete has been cured and polished (if desired), it is finally time to install your concrete countertops! You can use silicone caulk to attach the countertops to the base cabinets.
If you are installing an undermount sink, be sure to seal around the edges with silicone caulk before attaching the countertop.
Use shims to level the countertops, if necessary.

Conclusion
Installing concrete countertops is a great way to update your kitchen or bathroom. This project can be completed in a few days, from start to finish.
Remember to seal the concrete to make it food safe and help protect it from stains and other damage.
With proper care, your concrete countertops will last for many years to come!
Have you ever installed concrete countertops? Share your tips and experiences in the comments below!
Check out our series on concrete countertops:
3 comments
Comments are closed.